前面我们重点介绍了CRF的原理,损失函数以及分数的计算。本节将结合前面的相关内容,介绍基于PyTorch(1.0)框架实现BILSTM-CRF模型及一些需要注意的细节。
模型总览
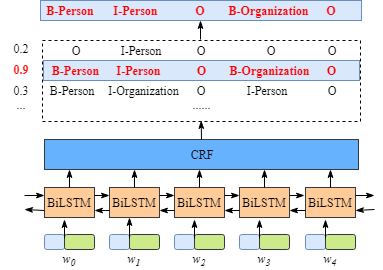
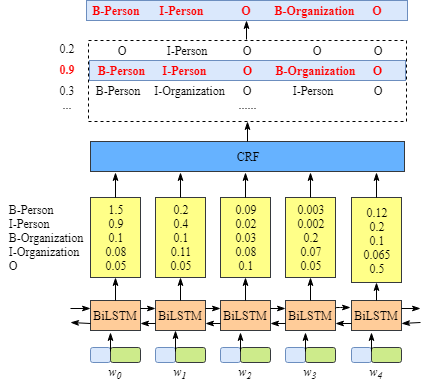
整个模型结构如下所示,我们也将按照该结构进行实现代码。
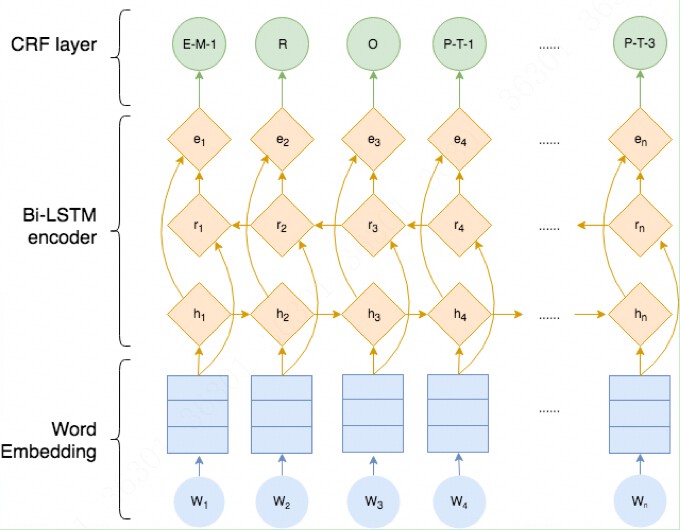
由上图可知,整个BILSTM-CRF模型由BILSTM、CRF、损失函数和预测函数几部分组成。BILSTM的输出作为CRF的输入,损失函数定义在CRF中, 损失函数使用前向算法,预测函数使用Viterbi算法,下面逐一介绍。
1
2
3
4
5
6
7
8
9
10
11
12
13
14
15
16
17
18
19
20
21
22
23
24
25
26
27
28
29
30
31
32
33
34
35
| class BILSTM_CRF(nn.Module):
def __init__(self,
vocab_size,
word_embedding_dim,
word2id,
hidden_size, bi_flag,
num_layer, input_size,
cell_type, dropout,
num_tag, checkpoint_dir):
super(BILSTM_CRF, self).__init__()
self.embedding = nn.Embedding(vocab_size, word_embedding_dim)
for p in self.embedding.parameters():
p.requires_grad = False
self.embedding.weight.data.copy_(torch.from_numpy(get_embedding(vocab_size,
word_embedding_dim,
word2id)))
self.rnn = RNN(hidden_size, bi_flag,
num_layer, input_size,
cell_type, dropout, num_tag)
self.crf = CRF(num_tag=num_tag)
self.checkpoint_dir = checkpoint_dir
def forward(self, inputs, length):
embeddings = self.embedding(inputs)
rnn_output = self.rnn(embeddings, length)
return rnn_output
def loss_fn(self, rnn_output, labels, length):
loss = self.crf.negative_log_loss(inputs=rnn_output, length=length, tags=labels)
return loss
def predict(self, rnn_output, length):
best_path = self.crf.get_batch_best_path(rnn_output, length)
return best_path
|
BILSTM
BILSTM模型这里采用的是双向LSTM。LSTM的输出(维度为 batch_size * time_steps * hidden_size)经过线性层(hidden_size * num_tag)变为(batch_size * time_steps * num_tag), 这是最终的输出结果。其中,hidden_size是LSTM隐藏层个数*2(因为是双向), num_tag为需要标注的标签个数。
备注:
LSTM 参数说明:
- num_layers: 表示几层的循环网络,默认为1
- dropout:除了最后一层之外都引入一个dropout
- batch_first:默认为False,因为nn.lstm接受的数据输入时(seq_len,batch_size,embed_dize),
- 如果为True,则转化为(batch_szie,seq_len.embed_size)
- input_size: 输入数据的特征数
- hidden_size:输出的特征数(hidden_size)
使用LSTM网络的使用方式,每一层LSTM都有三个外界的输入数据,即:
- X;LSTM网络输入的数据
- h_0: 上一层LSTM输出的结果
- c_0: 上一层LSTM调整后的记忆
一般而言h_0和c_0初始化为0(每batch都会初始化为0)
LSTM的输出为:
- (seq_len,batch,hidden_size * num_directions),
- h_n: (num_layers * num_directions , batch_size, hidden_size)
- c_n : (num_layers * num_directions , batch_size, hidden_size)
CRF
损失函数
对于一个句子,损失函数为这个句子的所有可能的路径得分之和减去真实路径得分。值得注意的是,这里的“路径”指的句子中的有小部分,不包括padding部分。
对于一个batch,我们将所有句子的损失函数相加,然后除以总的句子长度,将损失分配到每个字上,作为训练的损失函数。
这里的重点在于计算真实路径得分和所有路径得分之和,下面来看。
1
2
3
4
5
6
7
8
9
10
11
12
13
14
15
16
17
18
19
20
21
22
23
24
25
26
| def negative_log_loss(self, inputs, length, tags):
"""
features:(batch_size, time_step, num_tag)
target_function = P_real_path_score/P_all_possible_path_score
= exp(S_real_path_score)/ sum(exp(certain_path_score))
我们希望P_real_path_score的概率越高越好,即target_function的值越大越好
因此,loss_function取其相反数,越小越好
loss_function = -log(target_function)
= -S_real_path_score + log(exp(S_1 + exp(S_2) + exp(S_3) + ...))
= -S_real_path_score + log(all_possible_path_score)
"""
if not self.use_cuda:
inputs = inputs.cpu()
length = length.cpu()
tags = tags.cpu()
loss = Variable(torch.tensor(0.), requires_grad=True)
num_chars = torch.sum(length.data).float()
for ix, (features, tag) in enumerate(zip(inputs, tags)):
features = features[:length[ix]]
tag = tag[:length[ix]]
real_score = self.real_path_score(features, tag)
total_score = self.all_possible_path_score(features)
cost = total_score - real_score
loss = loss + cost
return loss/num_chars
|
转移矩阵
在介绍得分计算之前,先来看下CRF中的一个重要的训练参数,转移矩阵。转移矩阵的定义决定了后面前向算法和维特比算法的实现,因此十分重要。
我们的标签序列id映射定义为:
1
2
3
4
5
6
7
8
9
10
11
12
13
| tag_to_ix = {
"B_PER": 0,
"I_PER": 1,
"B_LOC": 2,
"I_LOC": 3,
"B_ORG": 4,
"I_ORG": 5,
"B_T": 6,
"I_T": 7,
"O": 8,
"SOS": 9,
"EOS":10
}
|
转移矩阵的大小为:(num_tag +2, num_tag +2)。+2是因为包含了起始符号和结束符号。
并且,P_jk 表示从tag_j到tag_k的得分,这样就有:
此外,在均匀初始化时,设定起始符号和结束符号对应的转移分数,使得:
1
2
3
4
5
6
7
8
9
10
11
12
13
14
15
| def __init__(self, num_tag, use_cuda=False):
if num_tag <= 0:
raise ValueError("Invalid value of num_tag: %d" % num_tag)
super(CRF, self).__init__()
self.num_tag = num_tag
self.start_tag = num_tag
self.end_tag = num_tag + 1
self.use_cuda = use_cuda
self.transitions = nn.Parameter(torch.Tensor(num_tag + 2, num_tag + 2))
nn.init.uniform_(self.transitions, -0.1, 0.1)
self.transitions.data[self.end_tag, :] = -10000
self.transitions.data[:, self.start_tag] = -10000
|
真实路径得分
真实路径得分由Emission score和Transition score组成。其中,转移分数是CRF需要训练的参数,我们随机初始化;Emission score是BISTLM的输出矩阵(对于每个句子,其维度为 time_steps * num_tag), 对于每个tag, 该矩阵都给出一个score,我们知道了真实的标签序列, 拿这个标签去索引该矩阵,即可得到真实路径的Emission score。
1
2
3
4
5
6
7
8
9
10
11
12
13
14
15
16
17
18
19
20
21
| def real_path_score(self, features, tags):
"""
features: (time_steps, num_tag)
real_path_score表示真实路径分数
它由Emission score和Transition score两部分相加组成
Emission score由LSTM输出结合真实的tag决定,表示我们希望由输出得到真实的标签
Transition score则是crf层需要进行训练的参数,它是随机初始化的,表示标签序列前后间的约束关系(转移概率)
Transition矩阵存储的是标签序列相互间的约束关系
在训练的过程中,希望real_path_score最高,因为这是所有路径中最可能的路径
"""
r = torch.LongTensor(range(features.size(0)))
if self.use_cuda:
pad_start_tags = torch.cat([torch.cuda.LongTensor([self.start_tag]), tags])
pad_stop_tags = torch.cat([tags, torch.cuda.LongTensor([self.end_tag])])
r = r.cuda()
else:
pad_start_tags = torch.cat([torch.LongTensor([self.start_tag]), tags])
pad_stop_tags = torch.cat([tags, torch.LongTensor([self.end_tag])])
score = torch.sum(self.transitions[pad_start_tags, pad_stop_tags]).cpu() + torch.sum(features[r, tags])
return score
|
所有路径分数之和
所有路径得分之和采用前向算法计算,算法复杂度为O(N * N * T), 其中N为标签个数,T为序列长度。
这里, 将start_tag的Emission score初始化为0,从start_tag开始,沿着序列一个字一个字地计算前向分数。
最后,加上end_tag的Transition score,即为所有START_TAG -> 1st word -> 2nd word ->…->END_TAG的分数。
事实上,前向算法的精髓在于,用指数将每个字的得分用三个数存起来,而这三个数后面又是可以拆分的(指数的计算特性,乘法拆成加法。)
ps:如果对前向算法不是很明白或者大致明白但不是特别清晰,建议画个图看下就一目了然了。比如:
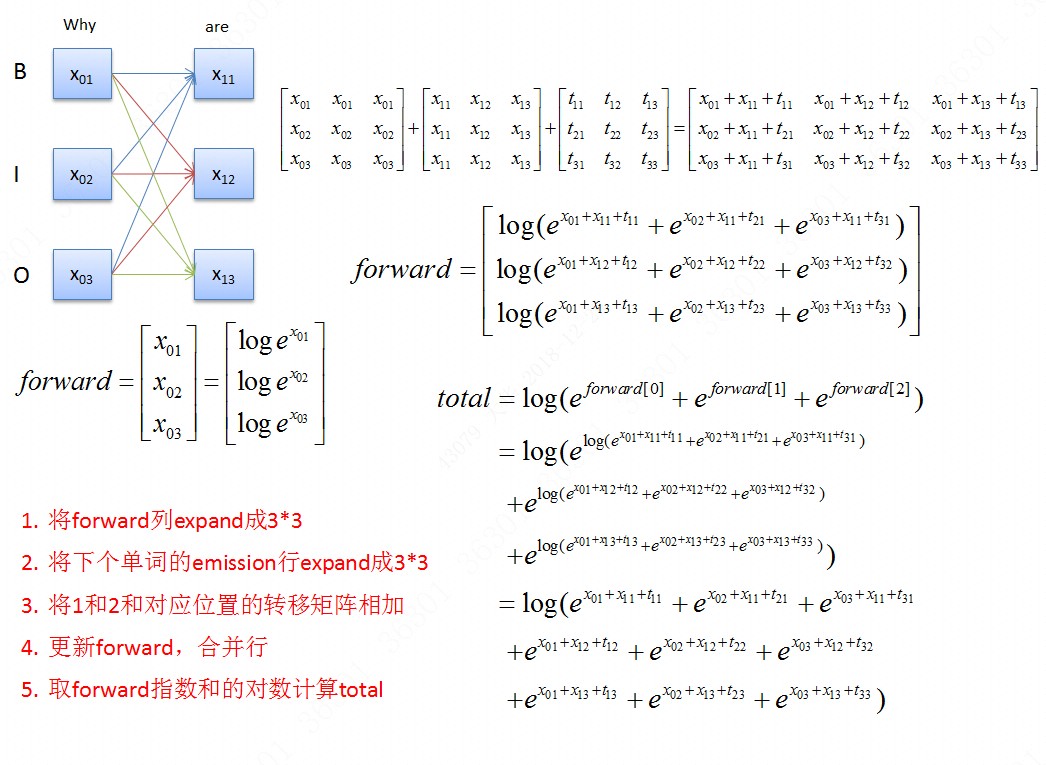
需要注意的是,根据前向算法,需要计算指数和的log,即 log_sum_exp, 由于前向方法是一个不断累积的过程, 会导致exp之和趋于无穷大,超过计算机的浮点数最大值限制,出现“上溢”。避免这种做法的手段是,找到整个矩阵的最大值,将矩阵减去该最大值进行指数求和,最终结果再加上该最大值即可。减去最大值后求指数和尽管也会出现无穷大的情况,但是这时是在分母上,该项可以计算为0,这样我们取log后仍可以得到一个合理的数值。
1
2
3
4
5
6
7
8
9
10
11
12
13
14
15
16
17
18
19
20
21
22
23
24
25
26
27
28
29
30
31
32
33
34
35
36
37
38
39
40
41
42
| def all_possible_path_score(self, features):
"""
计算所有可能的路径分数的log和:前向算法
step1: 将forward列expand成9*9
step2: 将下个单词的emission行expand成9*9
step3: 将1和2和对应位置的转移矩阵相加
step4: 更新forward,合并行
step5: 取forward指数的对数计算total
"""
time_steps = features.size(0)
forward = Variable(torch.zeros(self.num_tag))
if self.use_cuda:
forward = forward.cuda()
for i in range(0, time_steps):
emission_start = forward.expand(self.num_tag, self.num_tag).t()
emission_end = features[i,:].expand(self.num_tag, self.num_tag)
if i == 0:
trans_score = self.transitions[self.start_tag, :self.start_tag].cpu()
else:
trans_score = self.transitions[:self.start_tag, :self.start_tag].cpu()
sum = emission_start + emission_end + trans_score
forward = log_sum(sum, dim=0)
forward = forward + self.transitions[:self.start_tag, self.end_tag].cpu()
total_score = log_sum(forward, dim=0)
return total_score
def log_sum(matrix, dim):
"""
前向算法是不断累积之前的结果,这样就会有个缺点
指数和累积到一定程度后,会超过计算机浮点值的最大值,变成inf,这样取log后也是inf
为了避免这种情况,我们做了改动:
1. 用一个合适的值clip去提指数和的公因子,这样就不会使某项变得过大而无法计算
SUM = log(exp(s1)+exp(s2)+...+exp(s100))
= log{exp(clip)*[exp(s1-clip)+exp(s2-clip)+...+exp(s100-clip)]}
= clip + log[exp(s1-clip)+exp(s2-clip)+...+exp(s100-clip)]
where clip=max
"""
clip_value = torch.max(matrix)
clip_value = int(clip_value.data.tolist())
log_sum_value = clip_value + torch.log(torch.sum(torch.exp(matrix-clip_value), dim=dim))
return log_sum_value
|
整个训练部分至此就介绍完了。下面介绍使用维特比算法进行预测。
预测
预测算法迭代过程和前向算法类似。不同的是,forward不再是到该点的路径得分之和,而是到该点的所有路径中最大得分, 这样我们就有了到该点的最大路径。同时,在迭代过程中 ,我们将最大路径中到当前节点(具有最大分数)的前一个节点的索引存储下来,作为最佳路径点。
中间的迭代过程较容易理解,比较绕的是
我们只需要把握一个点,上面的问题就能迎刃而解:
预测的时候,我们要从START_TAG -> 1st word -> 2nd word ->…->END_TAG,一个都不能少!
最后希望这张图能够帮助你理解算法中的细节。
1
2
3
4
5
6
7
8
9
10
11
12
13
14
15
16
17
18
19
20
21
22
23
24
25
26
27
28
29
30
31
32
33
34
35
36
37
38
39
40
41
42
43
44
45
46
47
48
49
50
51
52
53
54
55
56
57
58
59
| def viterbi(self, features):
time_steps = features.size(0)
forward = Variable(torch.zeros(self.num_tag))
if self.use_cuda:
forward = forward.cuda()
back_points, index_points = [self.transitions[self.start_tag, :self.start_tag].cpu()], [torch.LongTensor([-1]).expand_as(forward)]
for i in range(1, time_steps):
emission_start = forward.expand(self.num_tag, self.num_tag).t()
emission_end = features[i,:].expand(self.num_tag, self.num_tag)
trans_score = self.transitions[:self.start_tag, :self.start_tag].cpu()
sum = emission_start + emission_end + trans_score
forward, index = torch.max(sum.detach(), dim=0)
back_points.append(forward)
index_points.append(index)
back_points.append(forward + self.transitions[:self.start_tag, self.end_tag].cpu())
return back_points, index_points
def get_best_path(self, features):
back_points, index_points = self.viterbi(features)
best_last_point = argmax(back_points[-1])
index_points = torch.stack(index_points)
m = index_points.size(0)
best_path = [best_last_point]
for i in range(m-1, 0, -1):
best_index_point = index_points[i][best_last_point]
best_path.append(best_index_point)
best_last_point = best_index_point
best_path.reverse()
return best_path
def get_batch_best_path(self, inputs, length):
if not self.use_cuda:
inputs = inputs.cpu()
length = length.cpu()
max_len = inputs.size(1)
batch_best_path = []
for ix, features in enumerate(inputs):
features = features[:length[ix]]
best_path = self.get_best_path(features)
best_path = torch.Tensor(best_path).long()
best_path = padding(best_path, max_len)
batch_best_path.append(best_path)
batch_best_path = torch.stack(batch_best_path, dim=1)
return batch_best_path
def argmax(matrix, dim=0):
"""(0.5, 0.4, 0.3) —> 0"""
_, index = torch.max(matrix, dim=dim)
return index
def padding(vec, max_len, pad_token=-1):
new_vec = torch.zeros(max_len).long()
new_vec[:vec.size(0)] = vec
new_vec[vec.size(0):] = pad_token
return new_vec
|
到这里,我们就完成了整个BILSTM-CRF模型的构建,接下来,我们将使用该模型对人民日报数据进行NER任务。
完整代码见于github.
说明:在代码中,有两份CRF实现代码:
- 一份是基于一条条数据进行预测,该版本训练速度慢,但是收敛速度快,因为没有多余的信息进行干扰.
- 另一份是基于矩阵运算,训练速度快,但是相比之下收敛较慢。
BiLSTM-CRF模型中CRF层的运行原理(1)
BiLSTM-CRF模型中CRF层的运行原理(2)
BiLSTM-CRF模型中CRF层的运行原理(3)


