2023年7月18日,Meta发布了LLaMA2-最新版本大型语言模型(LLM)。LLaMA2训练使用了2万亿个Tokens,在许多基准测试中(包括推理、编码、熟练度和知识)测试效果优于其他LLM,包括。此次发布有不同的版本,参数大小为7B、13B和70B。这些模型可供商业和研究用途免费使用。

为了满足各种文本生成需求并对这些模型进行微调,我们将使用QLoRA (Efficient Finetuning of Quantized LLMs,这是一种高效的微调技术,它将预训练的LLM量化为仅4位,并添加了小的“低秩适配器”。这种独特的方法可以只使用单个GPU对LLM进行微调!并且PEFT库已支持QLoRA方法。

相关依赖

要成功微调LLaMA 2模型,您需要以下内容:

  • 填写Meta的表格以请求访问下一个版本的Llama。事实上,使用Llama 2受Meta许可证的管理,您必须接受该许可证才能下载模型权重和分词器。
  • 拥有Hugging Face账户(使用与Meta表单中相同的电子邮件地址)。
  • 拥有Hugging Face令牌。
  • 访问LLaMA 2可用模型(7B13B70B版本)的页面,并接受Hugging Face的许可条款和可接受使用政策。
  • 通过在笔记本的终端中运行huggingface-cli login命令登录Hugging Face模型中心,并输入您的令牌。您将不需要将您的令牌添加为git凭据。
  • 强大的计算资源:微调Llama 2模型需要大量的计算能力。

环境配置

创建一个requirements.txt文件,并填写以下内容:

1
2
3
4
5
6
7
8
torch
accelerate @ git+https://github.com/huggingface/accelerate.git
bitsandbytes
datasets==2.13.1
transformers @ git+https://github.com/huggingface/transformers.git
peft @ git+https://github.com/huggingface/peft.git
trl @ git+https://github.com/lvwerra/trl.git
scipy

运行以下命令进行依赖包安装

1
pip install -r requirements.txt

加载依赖模块

1
2
3
4
5
6
7
8
9
10
import argparse
import bitsandbytes as bnb
from datasets import load_dataset
from functools import partial
import os
from peft import LoraConfig, get_peft_model, prepare_model_for_kbit_training, AutoPeftModelForCausalLM
import torch
from transformers import AutoModelForCausalLM, AutoTokenizer, set_seed, Trainer, TrainingArguments, BitsAndBytesConfig, \
DataCollatorForLanguageModeling, Trainer, TrainingArguments
from datasets import load_dataset

模型下载

如前所述,LLaMA 2 有 7B、13B 和 70B 三个不同的版本。需要根据所拥有的计算资源进行选择,一般较大的模型需要更多的资源、内存、处理能力和训练时间。

1
2
3
4
5
6
7
8
9
10
11
12
13
14
15
16
def load_model(model_name, bnb_config):
n_gpus = torch.cuda.device_count()
max_memory = f'{40960}MB'

model = AutoModelForCausalLM.from_pretrained(
model_name,
quantization_config=bnb_config,
device_map="auto", # dispatch efficiently the model on the available ressources
max_memory = {i: max_memory for i in range(n_gpus)},
)
tokenizer = AutoTokenizer.from_pretrained(model_name, use_auth_token=True)

# Needed for LLaMA tokenizer
tokenizer.pad_token = tokenizer.eos_token

return model, tokenizer

数据下载

在下载数据集方面,有许多数据集可以帮助您对模型进行微调。您甚至可以使用自己的数据集!

在本教程中,我们将下载并使用Databricks Dolly 15k数据集,该数据集包含15,000个提示/响应对。它是在2023年3月和4月期间由5000多名Databricks员工精心制作的。

这个数据集是专门为大型语言模型的微调而设计的。它在CC BY-SA 3.0许可下发布,任何个人或公司都可以使用、修改和扩展它,甚至用于商业应用。因此,它非常适合我们的用例!

然而,像大多数数据集一样,这个数据集也有其局限性。确实,需要注意以下几点:

  • 它由从公共互联网收集的内容组成,这意味着它可能包含令人反感、不正确或有偏见的内容和拼写错误,这可能会影响使用此数据集进行微调的模型的行为。
  • 由于数据集是由Databricks的员工创建的,值得注意的是,数据集反映了Databricks员工的兴趣和语义选择,这可能不代表全球人口的共同利益。
  • 我们只能访问该数据集的训练子集,即其中最大的子集。
1
2
3
4
5
6
7
8
9
10
11
# Load the databricks dataset from Hugging Face
from datasets import load_dataset

dataset = load_dataset("databricks/databricks-dolly-15k", split="train")

print(f'Number of prompts: {len(dataset)}')
print(f'Column names are: {dataset.column_names}')

*** OUTPUT ***
Number of prompts: 15011
Column Names are: ['instruction', 'context', 'response', 'category']

我们可以看到,每个样本都是一个字典,其中包含:

  • instruction:用户可以输入的内容,如问题
  • context:帮助解释样本(上下文)
  • response:指令的答案
  • category一个类别:将样本分为开放式问答、封闭式问答、从维基百科中提取信息、从维基百科中总结信息、头脑风暴、分类、创意写作等类别

数据预处理

指令微调是一种常用技术,用于针对特定下游用例对基础 LLM 进行微调。

1
2
3
4
5
6
7
8
9
Below is an instruction that describes a task. Write a response that appropriately completes the request.

### Instruction:
Sea or Mountain

### Response:
I believe Mountain are more attractive but Ocean has it's own beauty and this tropical weather definitely turn you on! SO 50% 50%

### End

我们可以使用下面的函数,用标签对每个提示部分进行分隔:

1
2
3
4
5
6
7
8
9
10
11
12
13
14
15
16
17
18
19
20
21
22
23
24
25
26
27

def create_prompt_formats(sample):
"""
Format various fields of the sample ('instruction', 'context', 'response')
Then concatenate them using two newline characters
:param sample: Sample dictionnary
"""

INTRO_BLURB = "Below is an instruction that describes a task. Write a response that appropriately completes the request."
INSTRUCTION_KEY = "### Instruction:"
INPUT_KEY = "Input:"
RESPONSE_KEY = "### Response:"
END_KEY = "### End"

blurb = f"{INTRO_BLURB}"
instruction = f"{INSTRUCTION_KEY}\n{sample['instruction']}"
input_context = f"{INPUT_KEY}\n{sample['context']}" if sample["context"] else None
response = f"{RESPONSE_KEY}\n{sample['response']}"
end = f"{END_KEY}"

parts = [part for part in [blurb, instruction, input_context, response, end] if part]

formatted_prompt = "\n\n".join(parts)

sample["text"] = formatted_prompt

return sample

现在,我们将使用模型标记器把这些提示处理成标记化的提示。

我们的目标是创建长度一致的输入序列(适合微调语言模型,因为这样可以最大限度地提高效率和减少计算开销),这些序列不得超过模型的最大标记限制。

1
2
3
4
5
6
7
8
9
10
11
12
13
14
15
16
17
18
19
20
21
22
23
24
25
26
27
28
29
30
31
32
33
34
35
36
37
38
39
40
41
42
43
44
45
46
47
48
49
50
51
52
# SOURCE https://github.com/databrickslabs/dolly/blob/master/training/trainer.py
def get_max_length(model):
conf = model.config
max_length = None
for length_setting in ["n_positions", "max_position_embeddings", "seq_length"]:
max_length = getattr(model.config, length_setting, None)
if max_length:
print(f"Found max lenth: {max_length}")
break
if not max_length:
max_length = 1024
print(f"Using default max length: {max_length}")
return max_length


def preprocess_batch(batch, tokenizer, max_length):
"""
Tokenizing a batch
"""
return tokenizer(
batch["text"],
max_length=max_length,
truncation=True,
)


# SOURCE https://github.com/databrickslabs/dolly/blob/master/training/trainer.py
def preprocess_dataset(tokenizer: AutoTokenizer, max_length: int, seed, dataset: str):
"""Format & tokenize it so it is ready for training
:param tokenizer (AutoTokenizer): Model Tokenizer
:param max_length (int): Maximum number of tokens to emit from tokenizer
"""

# Add prompt to each sample
print("Preprocessing dataset...")
dataset = dataset.map(create_prompt_formats)#, batched=True)

# Apply preprocessing to each batch of the dataset & and remove 'instruction', 'context', 'response', 'category' fields
_preprocessing_function = partial(preprocess_batch, max_length=max_length, tokenizer=tokenizer)
dataset = dataset.map(
_preprocessing_function,
batched=True,
remove_columns=["instruction", "context", "response", "text", "category"],
)

# Filter out samples that have input_ids exceeding max_length
dataset = dataset.filter(lambda sample: len(sample["input_ids"]) < max_length)

# Shuffle dataset
dataset = dataset.shuffle(seed=seed)
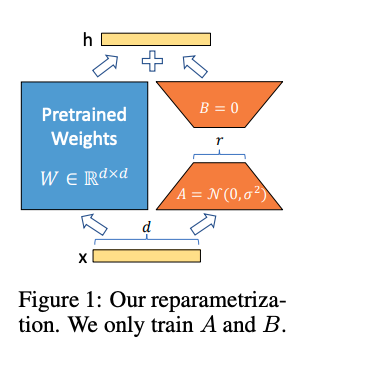
return dataset

有了这些函数,我们就可以对数据集进行微调了!

bitsandbytes配置

我们以 4 位加载 LLM。这样,我们就可以在较小计算资源的设备上导入模型。为了节省内存,我们选择使用 bfloat16 计算数据类型和嵌套量化。

1
2
3
4
5
6
7
8
9
def create_bnb_config():
bnb_config = BitsAndBytesConfig(
load_in_4bit=True,
bnb_4bit_use_double_quant=True,
bnb_4bit_quant_type="nf4",
bnb_4bit_compute_dtype=torch.bfloat16,
)

return bnb_config

要利用 LoRa 方法,我们需要将模型封装为 PeftModel。

为此,我们需要实现 LoRa 配置:

1
2
3
4
5
6
7
8
9
10
11
12
13
14
15
def create_peft_config(modules):
"""
Create Parameter-Efficient Fine-Tuning config for your model
:param modules: Names of the modules to apply Lora to
"""
config = LoraConfig(
r=16, # dimension of the updated matrices
lora_alpha=64, # parameter for scaling
target_modules=modules,
lora_dropout=0.1, # dropout probability for layers
bias="none",
task_type="CAUSAL_LM",
)

return config

前一个函数需要目标模块来更新必要的矩阵。下面的函数将为我们的模型获取这些目标模块。

1
2
3
4
5
6
7
8
9
10
11
12
# SOURCE https://github.com/artidoro/qlora/blob/main/qlora.py
def find_all_linear_names(model):
cls = bnb.nn.Linear4bit #if args.bits == 4 else (bnb.nn.Linear8bitLt if args.bits == 8 else torch.nn.Linear)
lora_module_names = set()
for name, module in model.named_modules():
if isinstance(module, cls):
names = name.split('.')
lora_module_names.add(names[0] if len(names) == 1 else names[-1])

if 'lm_head' in lora_module_names: # needed for 16-bit
lora_module_names.remove('lm_head')
return list(lora_module_names)

一切就绪并准备好基础模型后,我们可以使用 print_trainable_parameters() 辅助函数来查看模型中有多少可训练参数。

1
2
3
4
5
6
7
8
9
10
11
12
13
14
15
16
17
18
19
20
def print_trainable_parameters(model, use_4bit=False):
"""
Prints the number of trainable parameters in the model.
"""
trainable_params = 0
all_param = 0
for _, param in model.named_parameters():
num_params = param.numel()
# if using DS Zero 3 and the weights are initialized empty
if num_params == 0 and hasattr(param, "ds_numel"):
num_params = param.ds_numel

all_param += num_params
if param.requires_grad:
trainable_params += num_params
if use_4bit:
trainable_params /= 2
print(
f"all params: {all_param:,d} || trainable params: {trainable_params:,d} || trainable%: {100 * trainable_params / all_param}"
)

我们希望 LoRa 模型的可训练参数少于原始模型,因为我们要进行微调。

训练

现在一切准备就绪,我们可以预处理数据集,并使用设定的配置加载模型:

1
2
3
4
5
6
7
8
9
10
11
12
13
# Load model from HF with user's token and with bitsandbytes config

model_name = "meta-llama/Llama-2-7b-hf"

bnb_config = create_bnb_config()

model, tokenizer = load_model(model_name, bnb_config)
## Preprocess dataset

max_length = get_max_length(model)

dataset = preprocess_dataset(tokenizer, max_length, seed, dataset)

然后,我们就可以进行微调了:

1
2
3
4
5
6
7
8
9
10
11
12
13
14
15
16
17
18
19
20
21
22
23
24
25
26
27
28
29
30
31
32
33
34
35
36
37
38
39
40
41
42
43
44
45
46
47
48
49
50
51
52
53
54
55
56
57
58
59
60
61
62
63
64
65
66
67
68
69
70
71
72
73
74
75
76
77
78
79
def train(model, tokenizer, dataset, output_dir):
# Apply preprocessing to the model to prepare it by
# 1 - Enabling gradient checkpointing to reduce memory usage during fine-tuning
model.gradient_checkpointing_enable()

# 2 - Using the prepare_model_for_kbit_training method from PEFT
model = prepare_model_for_kbit_training(model)

# Get lora module names
modules = find_all_linear_names(model)

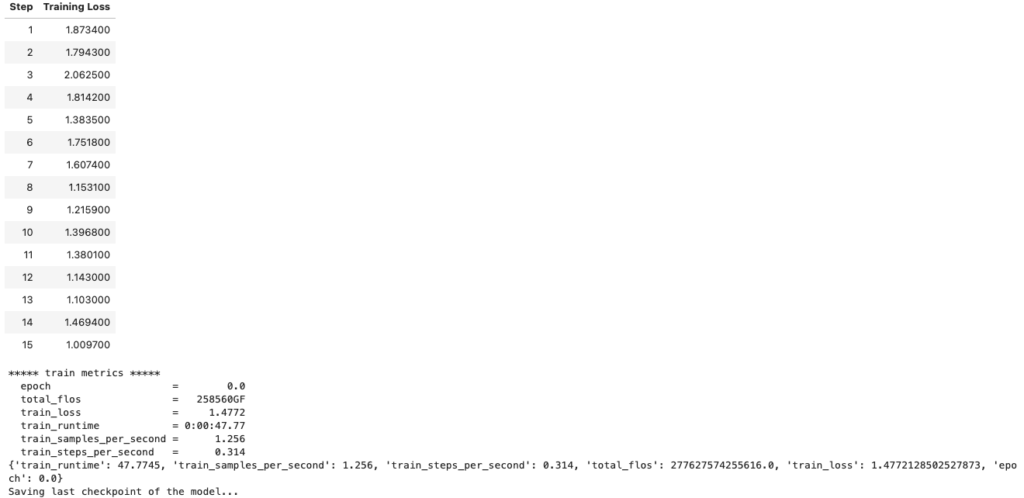
# Create PEFT config for these modules and wrap the model to PEFT
peft_config = create_peft_config(modules)
model = get_peft_model(model, peft_config)

# Print information about the percentage of trainable parameters
print_trainable_parameters(model)

# Training parameters
trainer = Trainer(
model=model,
train_dataset=dataset,
args=TrainingArguments(
per_device_train_batch_size=1,
gradient_accumulation_steps=4,
warmup_steps=2,
max_steps=20,
learning_rate=2e-4,
fp16=True,
logging_steps=1,
output_dir="outputs",
optim="paged_adamw_8bit",
),
data_collator=DataCollatorForLanguageModeling(tokenizer, mlm=False)
)

model.config.use_cache = False # re-enable for inference to speed up predictions for similar inputs

### SOURCE https://github.com/artidoro/qlora/blob/main/qlora.py
# Verifying the datatypes before training

dtypes = {}
for _, p in model.named_parameters():
dtype = p.dtype
if dtype not in dtypes: dtypes[dtype] = 0
dtypes[dtype] += p.numel()
total = 0
for k, v in dtypes.items(): total+= v
for k, v in dtypes.items():
print(k, v, v/total)

do_train = True

# Launch training
print("Training...")

if do_train:
train_result = trainer.train()
metrics = train_result.metrics
trainer.log_metrics("train", metrics)
trainer.save_metrics("train", metrics)
trainer.save_state()
print(metrics)

###

# Saving model
print("Saving last checkpoint of the model...")
os.makedirs(output_dir, exist_ok=True)
trainer.model.save_pretrained(output_dir)

# Free memory for merging weights
del model
del trainer
torch.cuda.empty_cache()


output_dir = "results/llama2/final_checkpoint"
train(model, tokenizer, dataset, output_dir)

如果您更喜欢通过模型进行几个时期(整个训练数据集将通过模型传递),而不是进行几个训练步骤(通过模型进行前向和反向传递,并使用一个数据批次),您可以通过num_train_epochs替换max_steps参数。

为了以后加载和使用模型进行推理,我们使用了trainer.model.save_pretrained(output_dir)函数,该函数会保存微调模型的权重、配置和分词器文件。

遗憾的是,最新的权重有可能不是最好的。为了解决这个问题,您可以在微调过程中通过转换器实现一个 EarlyStoppingCallback。这样,您就可以定期在验证集(如果有的话)上测试模型,并只保留最佳权重。

权重合并

有了微调权重后,我们就可以建立微调模型,并将其保存到一个新的目录中,同时保存相关的标记符。执行这些步骤后,我们就可以得到一个内存效率高的微调模型和标记符,并为推理做好准备!

1
2
3
4
5
6
7
8
9
10
model = AutoPeftModelForCausalLM.from_pretrained(output_dir, device_map="auto", torch_dtype=torch.bfloat16)
model = model.merge_and_unload()

output_merged_dir = "results/llama2/final_merged_checkpoint"
os.makedirs(output_merged_dir, exist_ok=True)
model.save_pretrained(output_merged_dir, safe_serialization=True)

# save tokenizer for easy inference
tokenizer = AutoTokenizer.from_pretrained(model_name)
tokenizer.save_pretrained(output_merged_dir)