本文主要是如何使用python进行人脸聚类。

使用Python进行人脸聚类

人脸常用的应用有人脸识别和人脸聚类。人脸识别和人脸聚类并不相同,但概念高度相关。当我们使用监督学习进行面部识别时,我们需要同时具有:

1.我们想要识别的面部的示例图像
2.与每个面部相对应的名字(即,“类标签”)。

但对于人脸聚类,我们使用的是无监督学习算法,我们只有没有名字(或者说标签)的人脸本身,并且我们需要识别和计算数据集中某些独特的人。

在本文的第一部分中,我们将讨论人脸聚类数据集以及将用于构建项目的项目结构。

需要编写两个Python脚本:

  • 一个用于提取和量化数据集中的人脸
  • 另一个是对面部进行聚类,其中每个结果聚类(理想情况下)代表一个独特的个体

然后,我们将在样本数据集上运行我们的人脸聚类管道并检查结果。

配置环境

所需要的python模块:

  • OpenCV
  • dlib
  • face_recognition
  • imutils
  • scikit-learn

如果有GPU,则需要安装带有CUDA的dlib。

人脸聚类数据集

图1 人脸数据集样本
由于2018年世界杯半决赛,我认为将人脸聚类应用于著名足球运动员的面孔会很有趣。

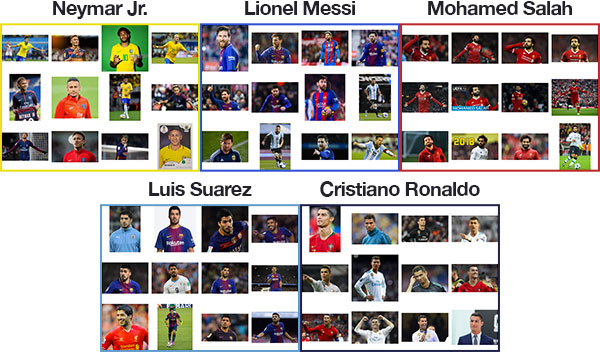
从上面的图1中可以看出,我已经整理了五个足球运动员的数据集,包括:

  • 穆罕默德·萨拉赫
  • 内马尔
  • C罗
  • 里奥·梅西
  • 路易斯·苏亚雷斯

数据集中总共有129个图像。

我们的目标是提取量化图像中每个面部的特征,并将得到的“面部特征向量”聚类。理想情况下,每个足球运动员都拥有自己的簇,并且仅包含他们自己的脸。

项目结构

1
2
3
4
5
6
7
8
9
10
11
12
13
14
15
$ tree --dirsfirst
.
├── dataset [129 entries]
│ ├── 00000000.jpg
│ ├── 00000001.jpg
│ ├── 00000002.jpg
│ ├── ...
│ ├── 00000126.jpg
│ ├── 00000127.jpg
│ └── 00000128.jpg
├── encode_faces.py
├── encodings.pickle
└── cluster_faces.py

1 directory, 132 files

我们的项目有一个目录和三个文件:

  • dataset:包含我们五个足球运动员的129张照片。请注意,在上面的输出中,文件名或其他文件中没有用于标识每个图像中的人员标识信息!根据文件名单独知道哪个足球运动员在哪个图像中是不可能的。我们将设计一个人脸聚类算法来识别数据集中相似且唯一的脸。
  • encode_faces.py :第一个脚本,对数据集中的所有的人脸计算面部嵌入并输出一个序列化的编码文件。
  • encodings.pickle :我们的面部嵌入序列化的pickle文件。
  • cluster_faces.py :在这个脚本中我们将聚类相似的人脸并找到异常值。

通过深度学习编码面孔

图2 人脸向量化
为了用数字表示人脸,我们用神经网络生成的128维特征向量对数据集中的所有人脸进行量化。

在我们对一组人脸进行聚类之前,我们首先需要对它们进行量化。这个量化人脸的过程将使用深度神经网络完成,该网络负责:

  • 接受输入图像
  • 并输出128维特征向量,量化人脸

下面,我们将讨论这个深度神经网络如何工作以及如何进行训练。encode_faces.py脚本包含为每张脸提取128维特征向量表示的所有代码。

新建一个名为encode_faces.py的文件 ,并写入以下代码:

1
2
3
4
5
6
7
8
9
10
11
12
13
14
15
16
17
# import the necessary packages
from imutils import paths
import face_recognition
import argparse
import pickle
import cv2
import os

# construct the argument parser and parse the arguments
ap = argparse.ArgumentParser()
ap.add_argument("-i", "--dataset", required=True,
help="path to input directory of faces + images")
ap.add_argument("-e", "--encodings", required=True,
help="path to serialized db of facial encodings")
ap.add_argument("-d", "--detection-method", type=str, default="cnn",
help="face detection model to use: either `hog` or `cnn`")
args = vars(ap.parse_args())

其中:

  • –dataset:人脸和图像输入目录的路径。
  • –encodings:包含面部编码的输出序列化pickle文件的路径。
  • –detection-method:你可以使用卷积神经网络(CNN)或方向梯度直方图(HOG)方法在量化面部之前检测输入图像中的人脸。CNN方法更准确(慢),而HOG方法更快(不太准确)。

稍微注意的是,如果这个脚本运行缓慢,或者你希望在没有GPU的情况下实时运行人脸聚类,可以将–detection-method设置为hog ,替代cnn。虽然CNN脸检测更准确,但在没有GPU运行实时检测速度太慢。

获取输入数据集中所有图像的路径:

1
2
3
4
5
# grab the paths to the input images in our dataset, then initialize
# out data list (which we'll soon populate)
print("[INFO] quantifying faces...")
imagePaths = list(paths.list_images(args["dataset"]))
data = []

imagePath变量中是所有图片数据的路径 。

遍历所有的imagePaths:

1
2
3
4
5
6
7
8
9
# loop over the image paths
for (i, imagePath) in enumerate(imagePaths):
# load the input image and convert it from RGB (OpenCV ordering)
# to dlib ordering (RGB)
print("[INFO] processing image {}/{}".format(i + 1,
len(imagePaths)))
print(imagePath)
image = cv2.imread(imagePath)
rgb = cv2.cvtColor(image, cv2.COLOR_BGR2RGB)

需要注意的是,我们对图像中交换颜色通道, 因为dlib默认rgb排序而不是OpenCV默认的bgr。

处理完了图像,让我们检测所有的人脸并获取它们的边界框坐标:

1
2
3
4
# detect the (x, y)-coordinates of the bounding boxes
# corresponding to each face in the input image
boxes = face_recognition.face_locations(rgb,
model=args["detection_method"])

我们必须先检测图像中人脸的实际位置,然后再对其进行量化,这里使用的是face_recognition API(非常易于使用)。

注意: 我们使用CNN模型进行面部检测可以获得更高的精度,但如果使用的是CPU而不是GPU,则运行时间会很长。如果希望更快地获取人脸编码输出,并且你的系统没有足够的内存或CPU支持CNN面部检测器,请改用HOG + Linear SVM方法。

在下一个部分中,我们将计算面部编码:

1
2
3
4
5
6
7
8
# compute the facial embedding for the face
encodings = face_recognition.face_encodings(rgb, boxes)

# build a dictionary of the image path, bounding box location,
# and facial encodings for the current image
d = [{"imagePath": imagePath, "loc": box, "encoding": enc}
for (box, enc) in zip(boxes, encodings)]
data.extend(d)

首先,我们计算rgb图像中每个检测到的人脸的128维面部编码输出。

然后对于结果,我们构建一个字典,其中包括:

  • 输入图像的路径
  • 图像中人脸的位置(即边界框)
  • 128维编码本身

然后我们将字典添加到我们的data列表中。稍后当我们想要查看哪些人脸属于哪个簇时,我们会用到此信息。

最后,我们将数据列表写入序列化的pickle文件:

1
2
3
4
5
# dump the facial encodings data to disk
print("[INFO] serializing encodings...")
f = open(args["encodings"], "wb")
f.write(pickle.dumps(data))
f.close()

运行面部编码脚本

运行以下命令,获取人脸编码特征:

1
2
3
4
5
6
7
8
9
10
11
12
13
14
15
16
$ python encode_faces.py --dataset dataset --encodings encodings.pickle
[INFO] quantifying faces...
[INFO] processing image 1/129
dataset/00000038.jpg
[INFO] processing image 2/129
dataset/00000010.jpg
[INFO] processing image 3/129
dataset/00000004.jpg
...
[INFO] processing image 127/129
dataset/00000009.jpg
[INFO] processing image 128/129
dataset/00000021.jpg
[INFO] processing image 129/129
dataset/00000035.jpg
[INFO] serializing encodings...

此过程可能需要一段时间,你可以用终端输出跟踪进度。

如果你使用GPU,大约1-2分钟。只要确保你安装DLIB与CUDA,把你的GPU的优势发挥出来。

但是,如果只使用CPU在笔记本电脑上执行脚本,则脚本可能需要运行20-30分钟。

人脸聚类

现在我们已经将数据集中的所有的人脸都量化并编码为128维向量,下一步就是将它们聚类成组。

我们希望每个人都有自己独立的簇。问题是,许多聚类算法,如k-means和Hierarchical Agglomerative Clustering,要求我们提前指定簇的数量。

在这个例子中,我们知道只有五个足球运动员,但在实际应用中,你可能并不知道数据集中有多少个人。

因此,我们需要使用基于密度或基于图的聚类算法,这样的算法不仅可以聚类数据点,还可以根据数据密度确定聚类数量。

对于人脸聚类,我推荐使用两种算法:

  • Density-based spatial clustering of applications with noise (DBSCAN)
  • Chinese whispers聚类

我们将在本教程中使用DBSCAN,因为我们的数据集相对较小。对于真正庞大的数据集,应该考虑使用Chinese whispers 算法,因为它是time linear的(详见wiki:Chinese Whispers)。

DBSCAN算法通过将在n维空间中紧密排列的点分组。靠在一起的点被分到同一个簇中。

DBSCAN也可以轻易的处理异常值,如果它们落在他们的“最近邻”很远的低密度区域,则标记它们。

接下来我们将使用DBSCAN实现人脸聚类。

新建一个名为cluster_faces.py ,并写入以下代码:

1
2
3
4
5
6
7
8
9
10
11
12
13
14
15
# import the necessary packages
from sklearn.cluster import DBSCAN
from imutils import build_montages
import numpy as np
import argparse
import pickle
import cv2

# construct the argument parser and parse the arguments
ap = argparse.ArgumentParser()
ap.add_argument("-e", "--encodings", required=True,
help="path to serialized db of facial encodings")
ap.add_argument("-j", "--jobs", type=int, default=-1,
help="# of parallel jobs to run (-1 will use all CPUs)")
args = vars(ap.parse_args())

scikit-learn中自带DBSCAN 。

从imutils导入build_montages模块。我们将使用此函数为每个簇构建“蒙太奇的脸”。

构建两个命令行参数:

  • –encodings:之前的脚本中生成的编码pickle文件的路径。
  • –jobs:DBSCAN是多线程的,可以将参数传递给包含要运行的并行作业数的构造函数,默认值–1的意思为使用所有可用的cpu个数。

让我们加载面部嵌入数据:

1
2
3
4
5
6
7
# load the serialized face encodings + bounding box locations from
# disk, then extract the set of encodings to so we can cluster on
# them
print("[INFO] loading encodings...")
data = pickle.loads(open(args["encodings"], "rb").read())
data = np.array(data)
encodings = [d["encoding"] for d in data]

首先,从磁盘加载面部编码的data。然后,将data处理为NumPy数组。最后,从data中提取128维编码,将它们放在一个列表中。

对编码特征数据进行聚类 :

1
2
3
4
5
6
7
8
9
# cluster the embeddings
print("[INFO] clustering...")
clt = DBSCAN(metric="euclidean", n_jobs=args["jobs"])
clt.fit(encodings)

# determine the total number of unique faces found in the dataset
labelIDs = np.unique(clt.labels_)
numUniqueFaces = len(np.where(labelIDs > -1)[0])
print("[INFO] # unique faces: {}".format(numUniqueFaces))

为了对编码特征进行聚类,我们需要创建一个DBSCAN对象,然后对特征数据进行拟合。

现在让我们确定数据集中的独特人类!

clt.labels_ 包含数据集中所有人脸的标签ID(即每个人脸所属的簇)。要查找独特面孔或标签的ID,我们只需使用NumPy的unique功能。结果是唯一的labelIDs列表 。

另外,我们计算numUniqueFaces 。该值可能是–1,在labelIDs中这个值对应于“异常值”类,即128维嵌入特征向量远离于其他簇中点。这些点被称为“异常值”(或者说,离群值),根据人脸聚类的应用它可能值得研究或简单地丢弃。

在我们的例子中,我们设计了计数中的负的labelID,因为我们知道我们的数据集只包含5个人的图像。是否这样做在很大程度上取决于你的项目。

接下来,我们将在数据集中生成独特的球员的面部蒙太奇。

循环遍历所有独特的labelID :

1
2
3
4
5
6
7
8
9
10
11
12
# loop over the unique face integers
for labelID in labelIDs:
# find all indexes into the `data` array that belong to the
# current label ID, then randomly sample a maximum of 25 indexes
# from the set
print("[INFO] faces for face ID: {}".format(labelID))
idxs = np.where(clt.labels_ == labelID)[0]
idxs = np.random.choice(idxs, size=min(25, len(idxs)),
replace=False)

# initialize the list of faces to include in the montage
faces = []

首先,我们找到当前labelID的所有索引 ,然后从其中随机选取最多25个图像样本嵌入蒙太奇中。

faces列表中包含原始图像。接下来,我们需要另一个循环来填充此列表:

1
2
3
4
5
6
7
8
9
10
11
# loop over the sampled indexes
for i in idxs:
# load the input image and extract the face ROI
image = cv2.imread(data[i]["imagePath"])
(top, right, bottom, left) = data[i]["loc"]
face = image[top:bottom, left:right]

# force resize the face ROI to 96x96 and then add it to the
# faces montage list
face = cv2.resize(face, (96, 96))
faces.append(face)

首先,从磁盘加载image,并使用在我们的面部嵌入步骤中找到的边界框坐标提取face ROI。然后,调整人脸到固定尺寸96×96(行10),所以我们可以把它添加到脸部蒙太奇(11行)用于可视化每个簇。

看看效果:

1
2
3
4
5
6
7
8
# create a montage using 96x96 "tiles" with 5 rows and 5 columns
montage = build_montages(faces, (96, 96), (5, 5))[0]

# show the output montage
title = "Face ID #{}".format(labelID)
title = "Unknown Faces" if labelID == -1 else title
cv2.imshow(title, montage)
cv2.waitKey(0)

人脸聚类结果

运行以下命令,执行人脸聚类:

1
2
3
4
5
6
7
8
9
10
$ python cluster_faces.py --encodings encodings.pickle
[INFO] loading encodings...
[INFO] clustering...
[INFO] # unique faces: 5
[INFO] faces for face ID: -1
[INFO] faces for face ID: 0
[INFO] faces for face ID: 1
[INFO] faces for face ID: 2
[INFO] faces for face ID: 3
[INFO] faces for face ID: 4

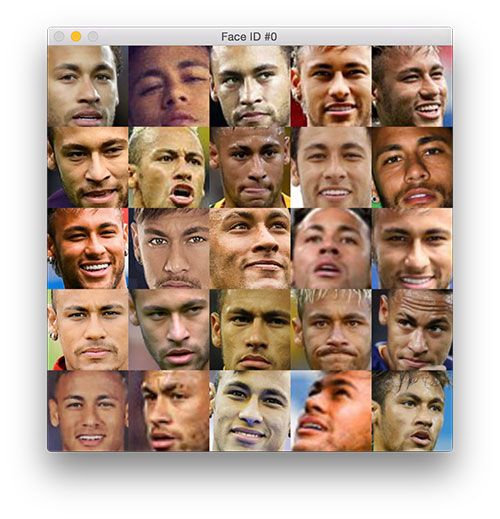
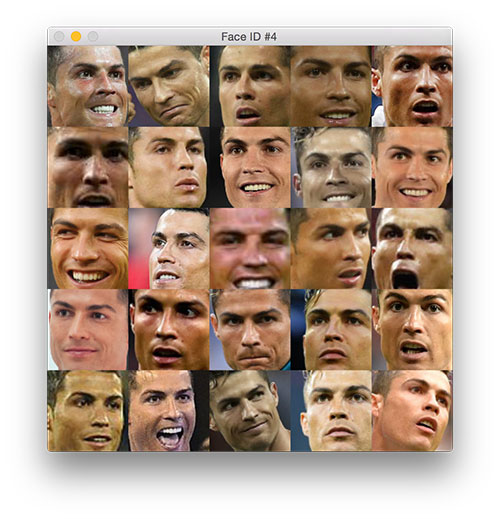
识别出五个人脸簇的类。face ID为-1包含找到的所有异常值,如图片所示。

以下是我们的128维面部嵌入和DBSCAN聚类算法在我们的数据集上生成的人脸聚类:

最后,陌生的人类被挑了出来(实际上它是先显示的):

这张梅西的照片并没有被聚类成功,而是识别为一张“未知的面孔”。我们的Python人脸聚类算法很好地完成了对图像的聚类,只是对这个人脸图像进行了错误的聚类。

在数据集中的5个人的129张图像中,只有一张脸没有被分组到现有的簇中。

我们的无监督学习DBSCAN方法生成了五个簇。不幸的是,梅西有一个图片并没有与他的其他图片放在一起,但整体来说这种方法效果不错。